

AI-ppliance Defiance Gameplay Trailer
AI-ppliance Defiance was created during the Collaborative Senior/Junior Games Development module at Staffordshire University, over a six week development period in January and February 2023.In this project I was the Co-Lead Programmer, Lead Animator, and Lead UI/UX Designer/Developer. It was my job to set tasks for all of the other programmers, animators and UI artists and make sure they do them on time and not too late. I would also set tasks for myself to complete.
As Lead Animator, I was the one in charge of implementing all of the animations that our junior animator had made in Blender into Unreal Engine 5. As Co-Lead Programmer, I was in charge of making all of the environmental blueprints. As Lead UI Designer/Developer, I was in charge of helping out making some of the UI assets in Photoshop and implementing them all in the project.
Game High Concept
The aim of Ai-ppliance Defiance is to reach the final boss and release its AI Brain Chip into space by finding weapons to defeat appliances and fix oxygen generators to stay alive.

Game Description
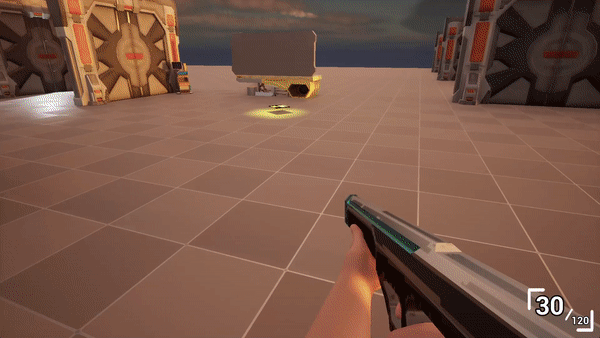
AI-ppliance Defiance is a first person sci-fi shooter game. The player controls Space Commander Hawkins who has been awoken from his cryo-chamber to find that all of the appliances on the ship have come to life. The player is tasked to defeat these enemies, avoid traps, and fix generators in order to obtain more weapons (Shotgun and Assault Rifle) and find and destroy the final boss.

The appliances that the player faces at the start are relatively easy, these are hoovers and toasters. As the player gets closer and closer towards the final boss, more enemies appear and harder enemies appear. The tougher ones are fridges, freezers, microwaves, and coffee machines. There are also landmines in the form of weighing scales scattered around the ship.

Each appliance has different abilities with different amounts of damage dealt to the player; the microwave runs at you and explodes, the fridge and toaster throws food at you, the freezer pours water on the floor making it very slippery for the player, the coffee machine sprays boiling coffee at the player, and the hoover sucks the player closer to them and whips them.

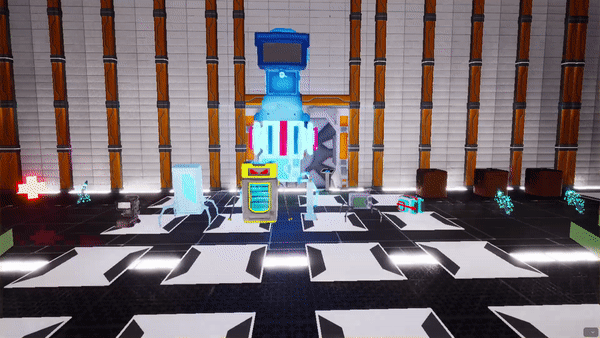
After defeating all of the enemies and finding every weapon and key card, the player must face the final boss. This enemy is a giant AI robot made up of the microwave, toaster, and coffee machine. This boss has three phases, one for each appliance. Once the player defeats the boss, they must throw their AI Brain out into space through the airlock.
Game Highlights (What I Worked On)
Programming
Particle Systems
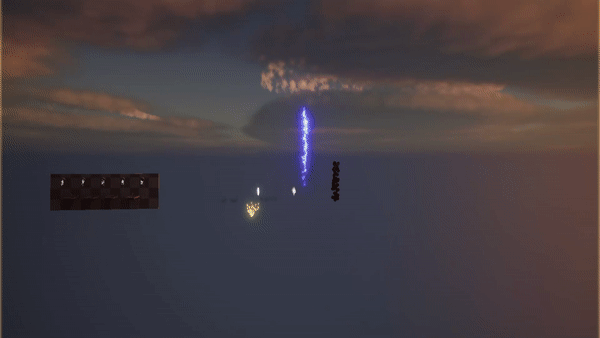
I created 23 particle systems using Unreal Engine's Niagara System. These particles include; an explosion, leaves falling, fire, electric shock, and mist. For the explosion, I made 10 emitters in that system, making it the most complex particle in the whole project. I used location events in the system to make smoke follow flying debris. I created the debris model in 3DS Max, this is just a low poly chunk of metal.

Doors and Airlocks
The single doors have a few different settings in them. Some doors in the level need specific key cards and some are just unlocked. There are three types of key cards, red, green, and blue. When I place a door in the scene, I check a box to tell the blueprint that a key card is needed, then I specify which key card is required using one of three check boxes.
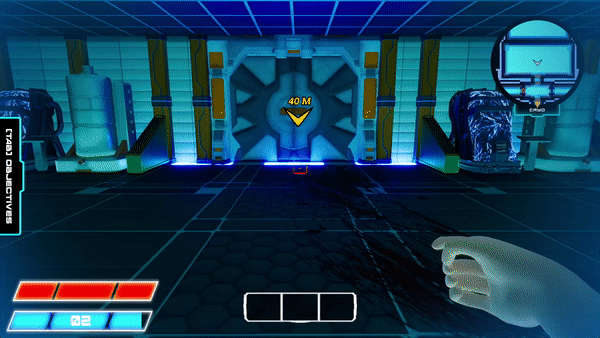
The 2-way airlock requires the AI Chip pickup to be unlocked, the 2-way airlock also triggers the final cutscene when the player enters it.
The 4-way airlock can be entered at any side, then all doors are locked, steam appears out of the roof to show it is being sealed, then all doors are unlocked again, the player now has a choice of which door to exit out of.
Dialogue System
The dialogue system includes a widget that will play one or two custom messages with a voice over option. I made a trigger blueprint that include instance editable variables in it which made it easier for me to place and set the dialogue in specific locations around the ship. I used a text to speech app called Narrator to get the voice over for the dialogue.
Environmental Blueprints
Some of the environment blueprints I created were; exploding barrels, parts (currency) pickup, AI Chip pickup, and poison mist area.
The exploding barrels spawn the explosion particle and a sphere trace that damages appliances and the player.
The AI Chip unlocks the airlock and plays the McEffa Installation cutscene.
The parts pickup adds a random value between 2 and 5 onto a currency variable, which is used in the weapon upgrade table.
The poison mist area spawns 2 poison mist blueprints that I made in a specific area set by a bounding box.
Game Highlights (What I Worked On)
UI/UX
Main Menu with Options Sub-Menus and Loading Screen
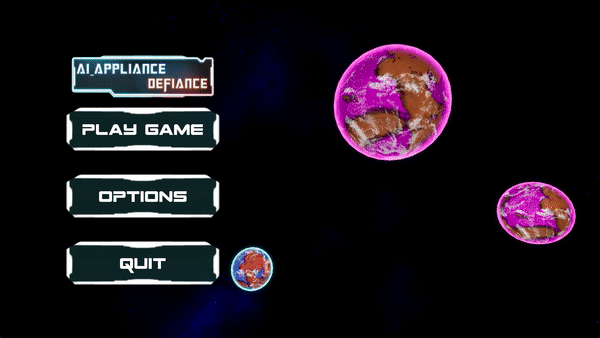
The Main Menu is shown in a separate level where I used the same sky sphere and planets as the ones used in the game level. The options menu features settings such as; window mode, screen resolution change, and volume change, these are all fully working. For the loading screen, I wanted it to tie in with the game's story, so instead of it saying "Loading" I made it say "Emergency Wake Up Initiated".
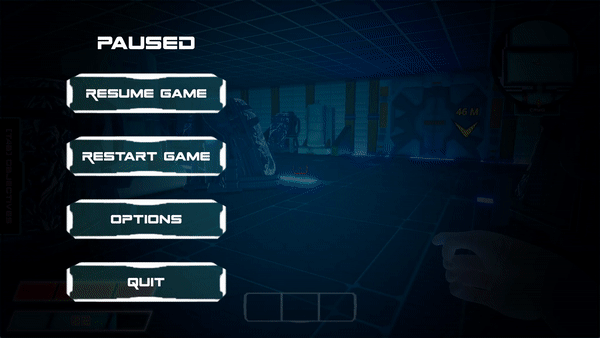
Pause Menu with Options Sub-Menus
The Pause Menu is basically the same as the main menu, but without the credits button in the options menu and the additional buttons and animations for quitting the game.
Credits Screen
I liked the idea of making the credits screen spatial rather than 2D on a black background which is what it was originally. I copied the cockpit part from the game level to a separate level and added the spatial UI to a blueprint and placed it in the world along with a particle system I created featuring floating appliances. The credits list style is inspired by Alien Isolation's credits list.
One of the Junior Programmers made the credits music.
HUD Implementation
Most of the blueprints for the HUD were not made by me. I set tasks for the other Senior and Junior Programmers to make these. I just edited them slightly to make them the desired size instead of full screen and added them to a Master HUD Class widget so only one widget needs to be called when adding it to the screen instead of calling each one individually.
I made the blueprint for the weapon hotbar making sure the images for each weapon only appear when the weapon has been picked up.
The other programmers made the widgets using the base styles, I added all of the UI art to them and animated a few of them.
Game Highlights (What I Worked On)
Animation
Animation Implementation
I was in charge of implementing all of the animations that the junior animator created in Blender. In Unreal Engine 5, I used animation Blend Spaces and Animation Blueprints to link all of the separate animations to one skeletal mesh to make them work in the game.

Cryo-Chamber Door
For the opening cutscene, I wanted the cryo-chamber door opening at the end of the sequence. I was going to do this in UE5 using a timeline, but I decided just to keyframe it in 3DS Max as I was already in there separating the door from the whole mesh.
Game Highlights (What I Worked On)
Cutscenes - Made In UE5’s Sequencer Tool
Opening Sequence
Description of Cutscene
The idea for the opening cutscene was to give a sense of horror with the space ambience background music. I wanted the character to be introduced and I thought the best way was to show the cryo-chamber door open with steam shooting out of the chamber. I also didn't want the character to just pop into the game after the cutscene, so I decided to make a quick wake up UI that will play right after the cutscene ends. This wake up UI is similar to the wake up scene in Skyrim.
Camera and Shot Use
This cutscene uses two cameras. The main one being the introductory camera that shows the opening in the cryo-chamber room, with the character being introduced as the camera zooms in on the cryo-chamber screen. The second camera is a stationary camera that shows the cryo-chamber door opening.
Final Boss Reveal
Description of Cutscene
This is where the final boss is introduced for the first time. The idea for this sequence is to keep it short, but it needed to be long enough so the whole dialogue can play and leave the screen before the cutscene ends.
Camera and Shot Use
This cutscene uses a single panning camera. It only needed this so the boss can be shown off, while still making it look quite menacing.
McEffa Anivirus Installation
Description of Cutscene
This scene pokes fun at a well known antivirus software that is known in the gaming community to affect performance when installed. The idea for this cutscene is for the player to pickup the AI chip and the antivirus is instantly installed, coming up on all monitors in the cockpit. As soon as the antivirus is installed, sparks fly off the control panels indicating that the antivirus is corrupting the whole ship. I also created the Logo for this antivirus in Photoshop.
Camera and Shot Use
This cutscene uses multiple camera shots with three cameras shooting the monitors when the antivirus is installed. The cameras are zooming out during these shots. Finally, a wide camera shot is used to show all monitors in one shot. This last part had to be long enough for the little bit of dialogue to play.
Ending Sequence
Description of Cutscene
The idea for this cutscene was to show the AI chip floating out of the airlock. As this chip controlled all of the appliances that came to life, they all explode one by one because the chip is gone. I created a blueprint for these exploding appliances so I could make them explode at specific times.
Camera and Shot Use
This cutscene uses a stationary camera at the start showing the AI chip leaving the ship. Then multiple panning shots are used to show multiple rooms where appliances are exploding.
AI-ppliance Defiance
Games Design Document
This Games Design Document was not made by me, it was made by the design team, I included this as I had to guide the design team on how a GDD is made, this document should give an idea on how the game was planned by the design team.